AMAZING! SO MUCH BETTER THAN ANY STORE BOUGHT PEANUT BUTTER CUPS…….
These are variations I have tried to date………
graham crackers and cacao bits
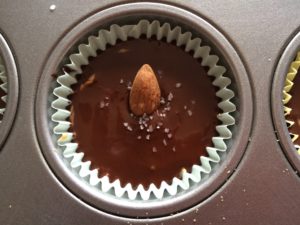
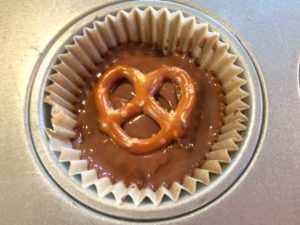
almonds and pretzels
Mix all ingredients until well blended. Put this mixture into the frig while you prepare the chocolate. It makes it easier to work with later.

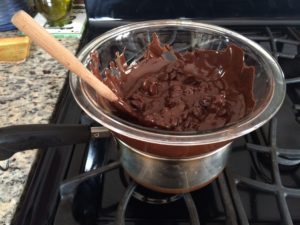
Take a small sauce pan and add about 1-2 cups water bring to boil. Break up chocolate into small pieces and put into a glass pyrex bowl. Turn water down to a simmer and place pyrex bowl of chocolate on pan, the steam is going to melt the chocolate. This is call bain-marie (basically a double boiler if you do not have a double boiler). I prefer this to microwave because it is more controlled.
Pour chocolate into a container with a pour spout. This makes it way easier and neater to pour the chocolate into the muffin tins.

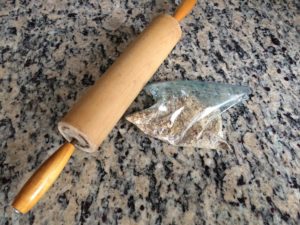
If you are using any ‘fillings’ such as pretzel bits, almonds, cacao bits, graham crackers, rice crispies, whatever you like……break up into smaller bits. I put the filling in a zip lock and use my rolling pin to break up the pieces.
Line muffin tins with paper liners. Pour enough chocolate into muffin tin to coat the bottom. I pour into center and then tap the pan a couple of times and the chocolate with spread out. Scoop about 1 TBSP. of peanut butter mixture and form a ball. Then press to flatten into a disk. Place on top of bottom chocolate layer. Add any ‘fillings’ that you like, if any.
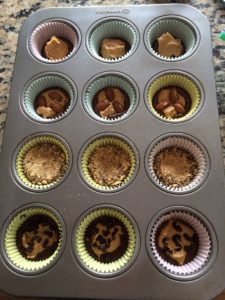
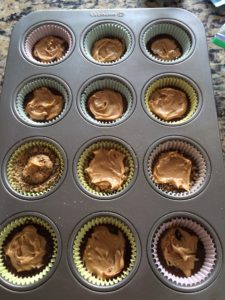
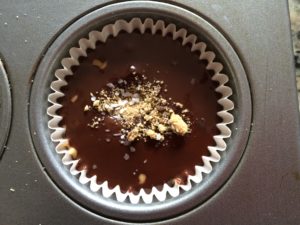
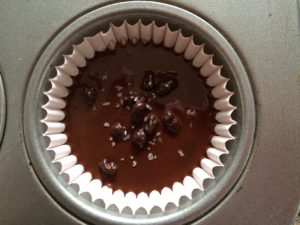
Pour chocolate to cover, again tapping the tin so the chocolate will fill all the empty spaces and create a smooth, flat surface. In order to differentiate all the fillings, I put a bit of the various fillings as a topping.

Place in freezer to set. Stores in airtight container in the refrigerator (I like them cold).
These freeze well too so make a bunch ahead. They DO NOT last long. It’s a nice treat, tastes way better than store bought. Every time I bring these to the office, people rave and want more!!!!

after trialing a few recipes, here is my version of the peanut butter cup that can be so versatile and customized to any dietary needs
- 1/2 cup confectioner's sugar
- 1 cup peanut butter, creamy or crunchy easily substitute almond butter, cashew butter, etc.
- 4 TBSP unsalted butter, room temp
- 1 tsp pure vanilla extract
- 16 ounces chocolate, any type 70% cocoa, milk, bittersweet. etc.
-
Mix all ingredients until well blended. Put this mixture into the frig while you prepare the chocolate. It makes it easier to work with later.
-
Take a small sauce pan and add about 1-2 cups water bring to boil.
-
Break up chocolate into small pieces and put into a glass pyrex bowl.
-
Turn water down to a simmer and place pyrex bowl of chocolate on pan, the steam is going to melt the chocolate. This is call bain-marie (basically a double boiler if you do not have a double boiler). I prefer this to microwave because it is more controlled.
-
Pour chocolate into a container with a pour spout. This makes it way easier and neater to pour the chocolate into the muffin tins.
-
If you are using any 'fillings' such as pretzel bits, almonds, cacao bits, graham crackers, rice crispies, whatever you like......break up into smaller bits. I put the filling in a zip lock and use my rolling pin to break up the pieces.
-
Line muffin tins with paper liners.
-
Pour enough chocolate into muffin tin to coat the bottom. I pour into center and then tap the pan a couple of times and the chocolate with spread out.
-
Scoop about 1 TBSP. of peanut butter mixture and form a ball. Then press to flatten into a disk. Place on top of bottom chocolate layer.
-
Add any 'fillings' that you like, if any.
-
Pour chocolate to cover, again tapping the tin so the chocolate will fill all the empty spaces and create a smooth, flat surface.
-
In order to differentiate all the fillings, I put a bit of the various fillings as a topping.
-
Place in freezer to set. Stores in airtight container in the refrigerator (I like them cold).
-
These freeze well too so make a bunch ahead. They DO NOT last long. It's a nice treat, tastes way better than store bought. Every time I bring these to the office, people rave and want more!!!!
- The cook time is really the 'freezer' time for them to set. There is no cooking!!
- From my research, if you want the chocolate to be less firm, you can add some cream or butter to the melting chocolate and it will set but will be softer shell. Try 8 ounces chocolate, 1 cup of cream. Heat the cream at a low simmer, then pour it over the chocolate pieces to melt it then whisk together. Once you pour into muffin tins, let set in frig until firm.
- I first tried scooping peanut butter into cups but I found making balls and pressing flat works better in terms of getting a more polished flat surface once you pour the chocolate over the top.