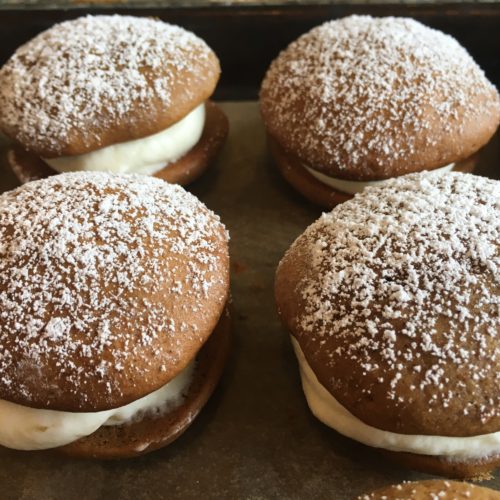
the perfect way to kickstart the fall season....this yummy warm and spicy (in a ginger/nutmeg/clove/cinnamon kinda way) bite-sized treat satisfies your sweet tooth without adding too much guilt
- 1/2 cup unsalted butter = 1 stick
- 2/3 cup dark brown sugar (I used light brown b/c I did not have dark)
- 1 large egg
- 1 tsp vanilla extract
- 1/4 cup molasses
- 2 1/4 cups all-purpose flour
- 1 TBSP ground ginger
- 1 1/2 tsp ground cinnamon
- 1 1/4 tsp baking soda
- 1 tsp salt
- 1 tsp ground nutmeg
- 1/2 tsp ground cloves
- 1 cup buttermilk (for thicker batter, use less)
- 2 8-ounce pkgs. light cream cheese (may use regular as well)
- 1/2 cup unsalted butter = 1 stick
- 1/2 cup crisco shortening
- 1 cup marshmallow fluff
- 1-1/2 cups sifted confectioner's sugar
- 1 tsp pure vanilla extract
- 1/4-1/2 cup minced crystallized ginger
-
Preheat the oven to 350ºF.
-
In the bowl of a stand mixer fitted with a paddle attachment, cream the butter and light or dark brown sugar.
-
Add the egg, vanilla extract, and molasses and beat until light and creamy.
-
In a large mixing bowl, combine the flour, ginger, cinnamon, baking soda, salt, nutmeg, and cloves and whisk to combine.
-
Add the dry ingredients to the contents of the stand-mixer bowl in three additions, alternating with additions of buttermilk, being sure to scrape down the sides of the bowl so that everything is well combined.
-
Using a 1" or 2" scoop mounds of batter on parchment paper–lined baking sheets, spacing them about 1 1/2 inches apart.
-
Bake for 15 to 18 minutes (the cakes should bounce back when gently poked). Remove from the oven and let cool completely.
-
While the 'pies' are cooling, make the filling.
-
Using stand mixer, add all ingredients and mix until creamy and smooth.
-
Take a basic kitchen storage bag and place filling in bag.
-
Snip one corner off and this becomes your DIY piping bag.
-
Turn half of the cooled pies so the flat side faces up. This is where you will place the filling.
-
Squeezing from the top of the bag to push it toward the snipped end, place filling on all flat-sided pies.
-
Top with other halves. Dust with powdered sugar if desired to serve immediately.
-
Otherwise, place back on baking sheet and place in freezer or refrigerator to set up.
-
Once set-up, place in an airtight container and store in the freezer or refrigerator for best freshness.
- this version made 10 larger pies and 13 smaller pies, it depends upon what size you prefer on how many the recipe will yield.
- using light brown sugar makes for a lighter color pie and less 'gingerbready' taste.
- low-fat buttermilk should work equally well here or other milk substitute like almond milk, soy milk, cashew milk, etc.
- in my next try for this recipe, I will add less milk for a thicker consistency batter and perhaps a more 'puffy' and dense pie (vs. a cake-like pie)